
Digital Sculpting 101: Programs
As makers, we share what we research, test, and use. If you decide to purchase anything we mention using our referral links, we may get a small commission at no cost to you. If you’d like to learn more, visit our affiliate policy.
To start, this post is for beginners that want to learn the basics about different programs used for sculpting digitally. I share my experience as a traditional sculptor navigating the reality of starting over as well as 3 programs I recommend you try.
And now, on with the show - Digital Sculpting 101: Programs
Personally, I love sculpting traditionally. The tactile nature of using tools to manipulate clay, foam, wood, etc is very fun. I like to keep my hands busy. You know, making all the things! All this to say, You don’t get this kind of immediate feedback in digital sculpting - period, but…If you can get through the growing pains of starting over like a beginner😭, You gain many powerful tools 💪. (Including the tools that help me do what I do now - design and create awesome keycaps!)

My digital sculpting journey wasn’t easy at all, especially when I first started. Even using a graphics tablet with a stylus didn’t make sense. I had to learn hand-eye coordination all over AGAIN. More on this later. But just know that I was basically baby deer-ing it for most of the time.
As a traditional sculptor, I was good at translating 2d drawings to 3d using all sorts of different materials and techniques. I also loved sculpting figures so I studied anatomy. For work, I was a prop builder, mold maker, and caster for film and TV, and did large-scale foam carving for theme parks. (Some examples below)

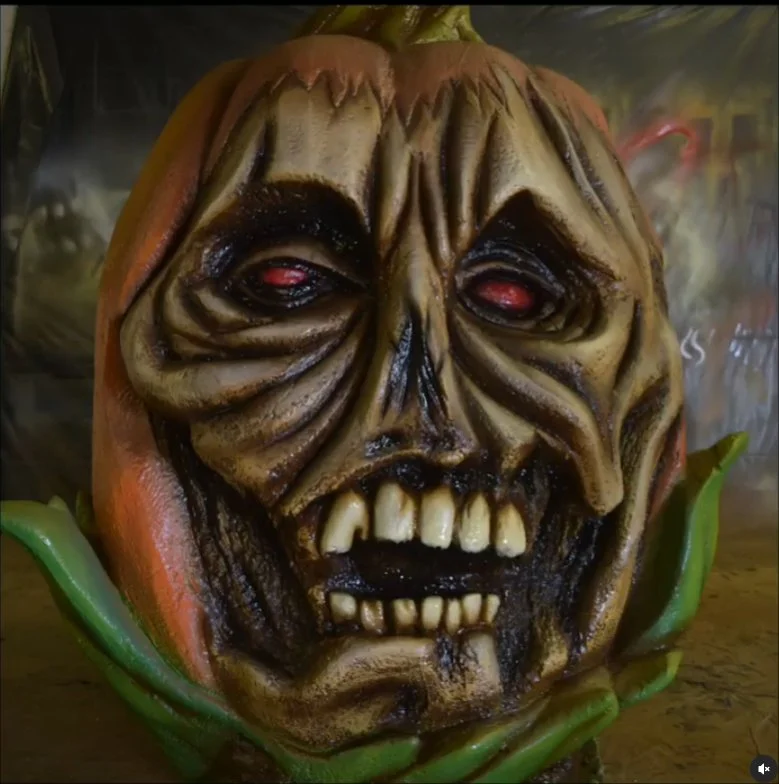
Good news everyone!! My realistic take of the Professor sculpted in polymer clay.


This digital stuff? No problem - I should be good at this stuff too! 😂 he said before he saw the program’s UI. (user interface) 😭
I found that coming from a traditional art background, it was very hard for me to learn the new tools (screen/graphic tablets) and programs. I rushed into it and got extremely frustrated with the UI and my previous understanding hindered my progress. It was not easy. I feel like I made it a lot harder than it had to be, getting in my own way by trying to apply what I knew already without understanding the basics of digital sculpting.
Only after I devoted deliberate practice and watching how master’s at programs like Zbrush do their work (aka hitting pause and rewind a lot) and embracing the suck of starting over - I was able to start slowly translating my previous skills. To start - sculpt using basic shapes to block out forms, breaking down complex ideas into just shapes, that’s a great way to use traditional art concepts for 3D!

I needed to retrain my understanding of what’s possible in digital sculpting. For instance, making more “clay” by just pulling it out of the shape, feels like digital black magic! It’s almost taken for granted that, unlike traditional sculpting, you don’t have to keep your oil clay warm and get your hands messy. Rather you get an unlimited amount of resources to work with! Also, why’s everything lumpy and not doing what I want it to do!? hint: subdivisions are your friends. There were a lot of basic concepts I needed to learn. (credit: Medicaldaily)
So if you’re ready, grab your tablet and stylus, and let the learning - begin!
Digital 3D 101 Sculpting and modeling are two ways to make digital magic. Sculpting refers to organic forms & modeling applies to hard surface objects. Think of sculpting for characters and modeling for their armor, weapons or vehicles, etc.

Digital Sculpting vs Traditional Sculpting
Some of the coolest things about digital sculpting include the ability to have mirrored symmetry for sculpting faces and characters is especially powerful. You can take separate parts and push them through each other, making parts transparent. Hide some parts while you work on other parts. Float them to see how they look in an open space. You get to navigate as if gravity was not an issue. AND You NEVER risk dropping your clay sculpture of Thor on the floor that one time and end up hating your life for all the time wasted. (Artist Credit @nocktte) But keep in mind that sculpting programs can occasionally still crash, so save and save often!

Fun Fact
Coincidentally, Thor’s Face being squished (Credit Vansh Mehra) is also a theme in every one of the Thor movies. Movie art imitates squished art, so it’s probably all on purpose! But just in case you didn’t want it that way - digital sculpting also has another amazing feature called undo, so you can Ctrl+z away any changes you don’t like.
There’s been a lot of 3d programs, especially for different industries. Some are cad based and some are mesh based. For this 101, we will be discussing the mesh-based programs -know that the rabbit hole goes deep. I will be giving a brief overview of some of the most popular programs, and what I think you should know as a beginner trying to find what works for you.
Beginners Blues
As you start the journey You might have a few feelings/thoughts which might include 1. “Why’s this so hard?” or in my case “Why am I so bad at this?” 2. How do I get better faster? To this, I say think less like an artist and more like an engineer, Iterate. Fail faster. Each iteration is to make the end product even better. Frequency over intensity (like brushing your teeth every day, vs brushing them for 3 hours on Sunday) and quantity of work leads to quality of work (do a lot, most of it will suck, you will get better). To borrow from Chris Do of The Futur - FAIL is First Attempt In Learning. If you need a creative mood boost I highly recommend watching his 2019 closing keynote speech.
I’ll be the first to tell you, it took me a long time to learn digital sculpting. The doubt and the insecurities were part of the process for me, as creative people, sometimes we get in our own way. But I promise you, if you show up and do the work, it gets better as you keep trying. I was in your place and I had to learn the basics.
Learn how to move around in a program. THEN You can start to apply your traditional knowledge of primary forms, secondary shapes, and tertiary details to a digital workflow. You’ll see how each principle applies to the tools. From detail stamping, with Alphas, and controlling exactly how strong or light your sculpting brushes affect the surface of the digital clay to changing materials on the fly to see how your sculpture would look in different conditions. These functions are available in all sculpting programs. Once you get the basics in one program you understand how to apply your learning to others. For instance, the terminology might change but the process is similar, ie. dynamesh in Zbrush is called dyntopo in Blender and perform relatively the same function. But let’s take a look at the Interfaces before we get too bogged down in terminology. (More on 3d terms you should know in a later post)
With that being said. The first program on this list. I present to you - Zbrush!
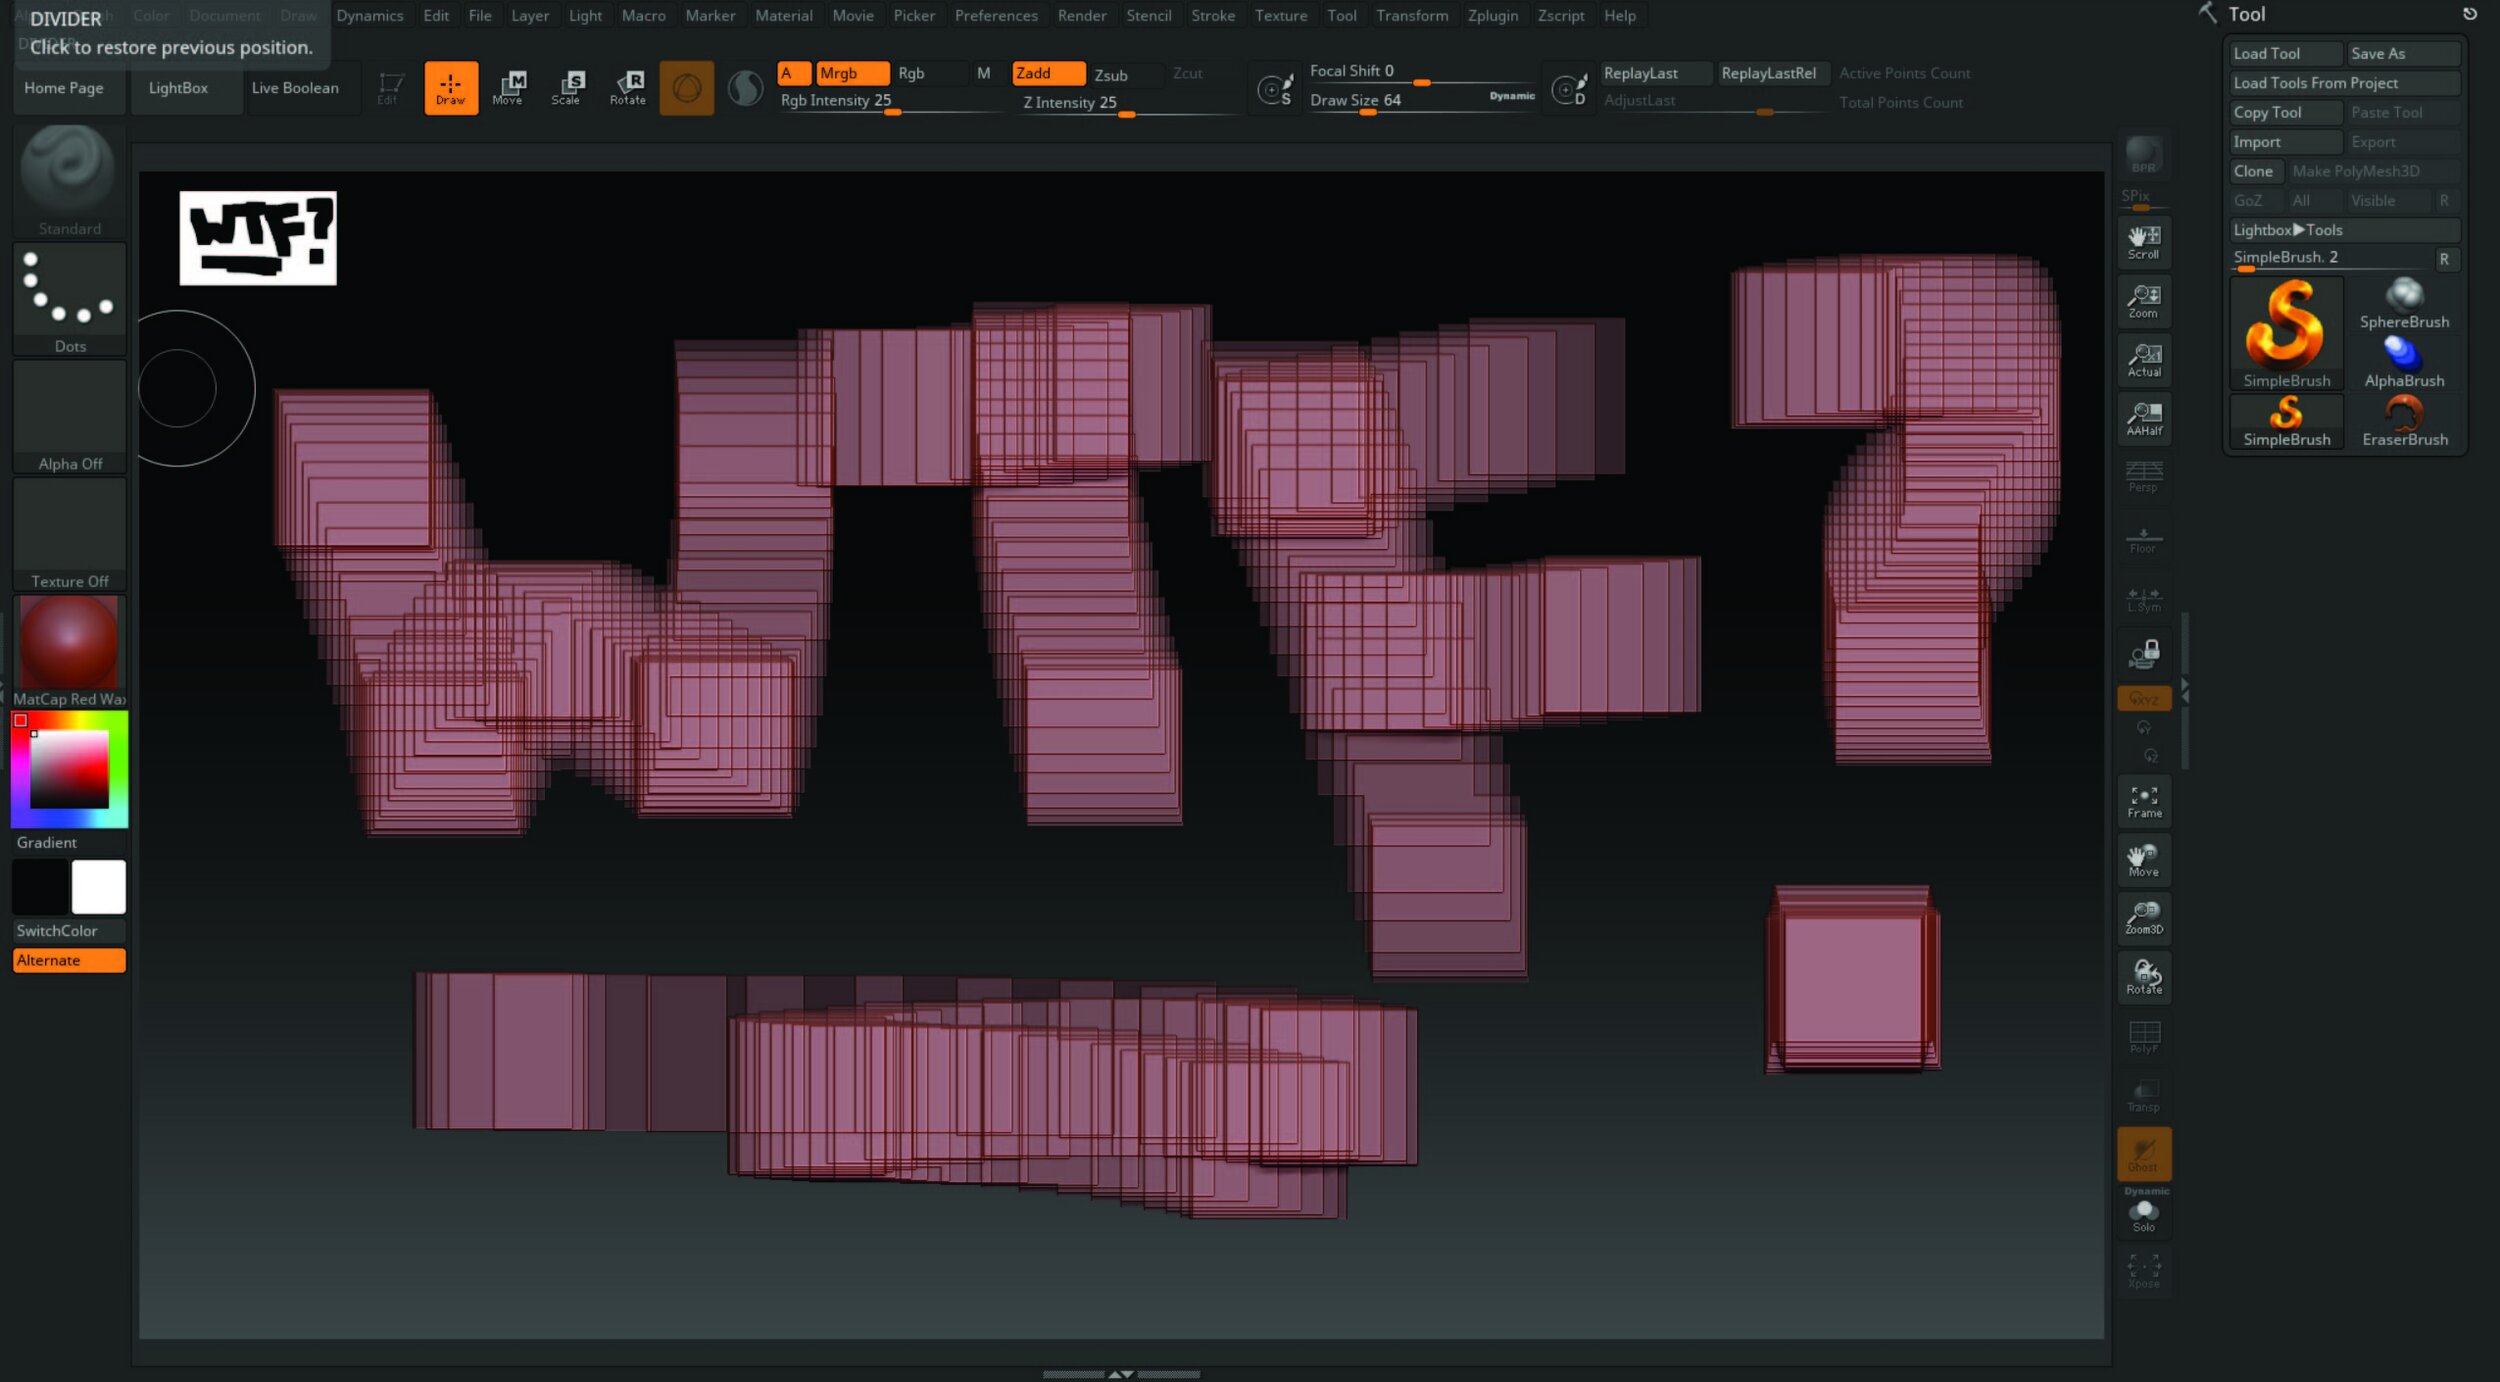
Welcome to the Zbrush interface!
This is exactly how most people feel when looking at Zbrush or any interface really for the first time. POV - You try to left-click, move around, and squares show up everywhere. You panic because what the hell is going on? They don’t have a helpful cartoon paper clip giving you hints (for those of you that remember Microsoft word) to press the Edit button to start and to press cntrl+N to clear the screen. You don’t know what you don’t yet know. According to a study in 2022 that I just made up, if you don’t feel this way - You might be a very well-adjusted person with all your ducks in a row or a liar.
Zbrush by Pixologic Maxon
Zbrush has been the go-to sculpting program of the entertainment and art industry for what seems like the past 20 years since its release in 1999. It’s the standard in the industry for a reason, but that doesn’t mean it’s perfect for everyone. That all depends on what your goals are. It can be used for characters for video games, movies, and tv, sculpting for collectibles to even creating amazing illustrations.
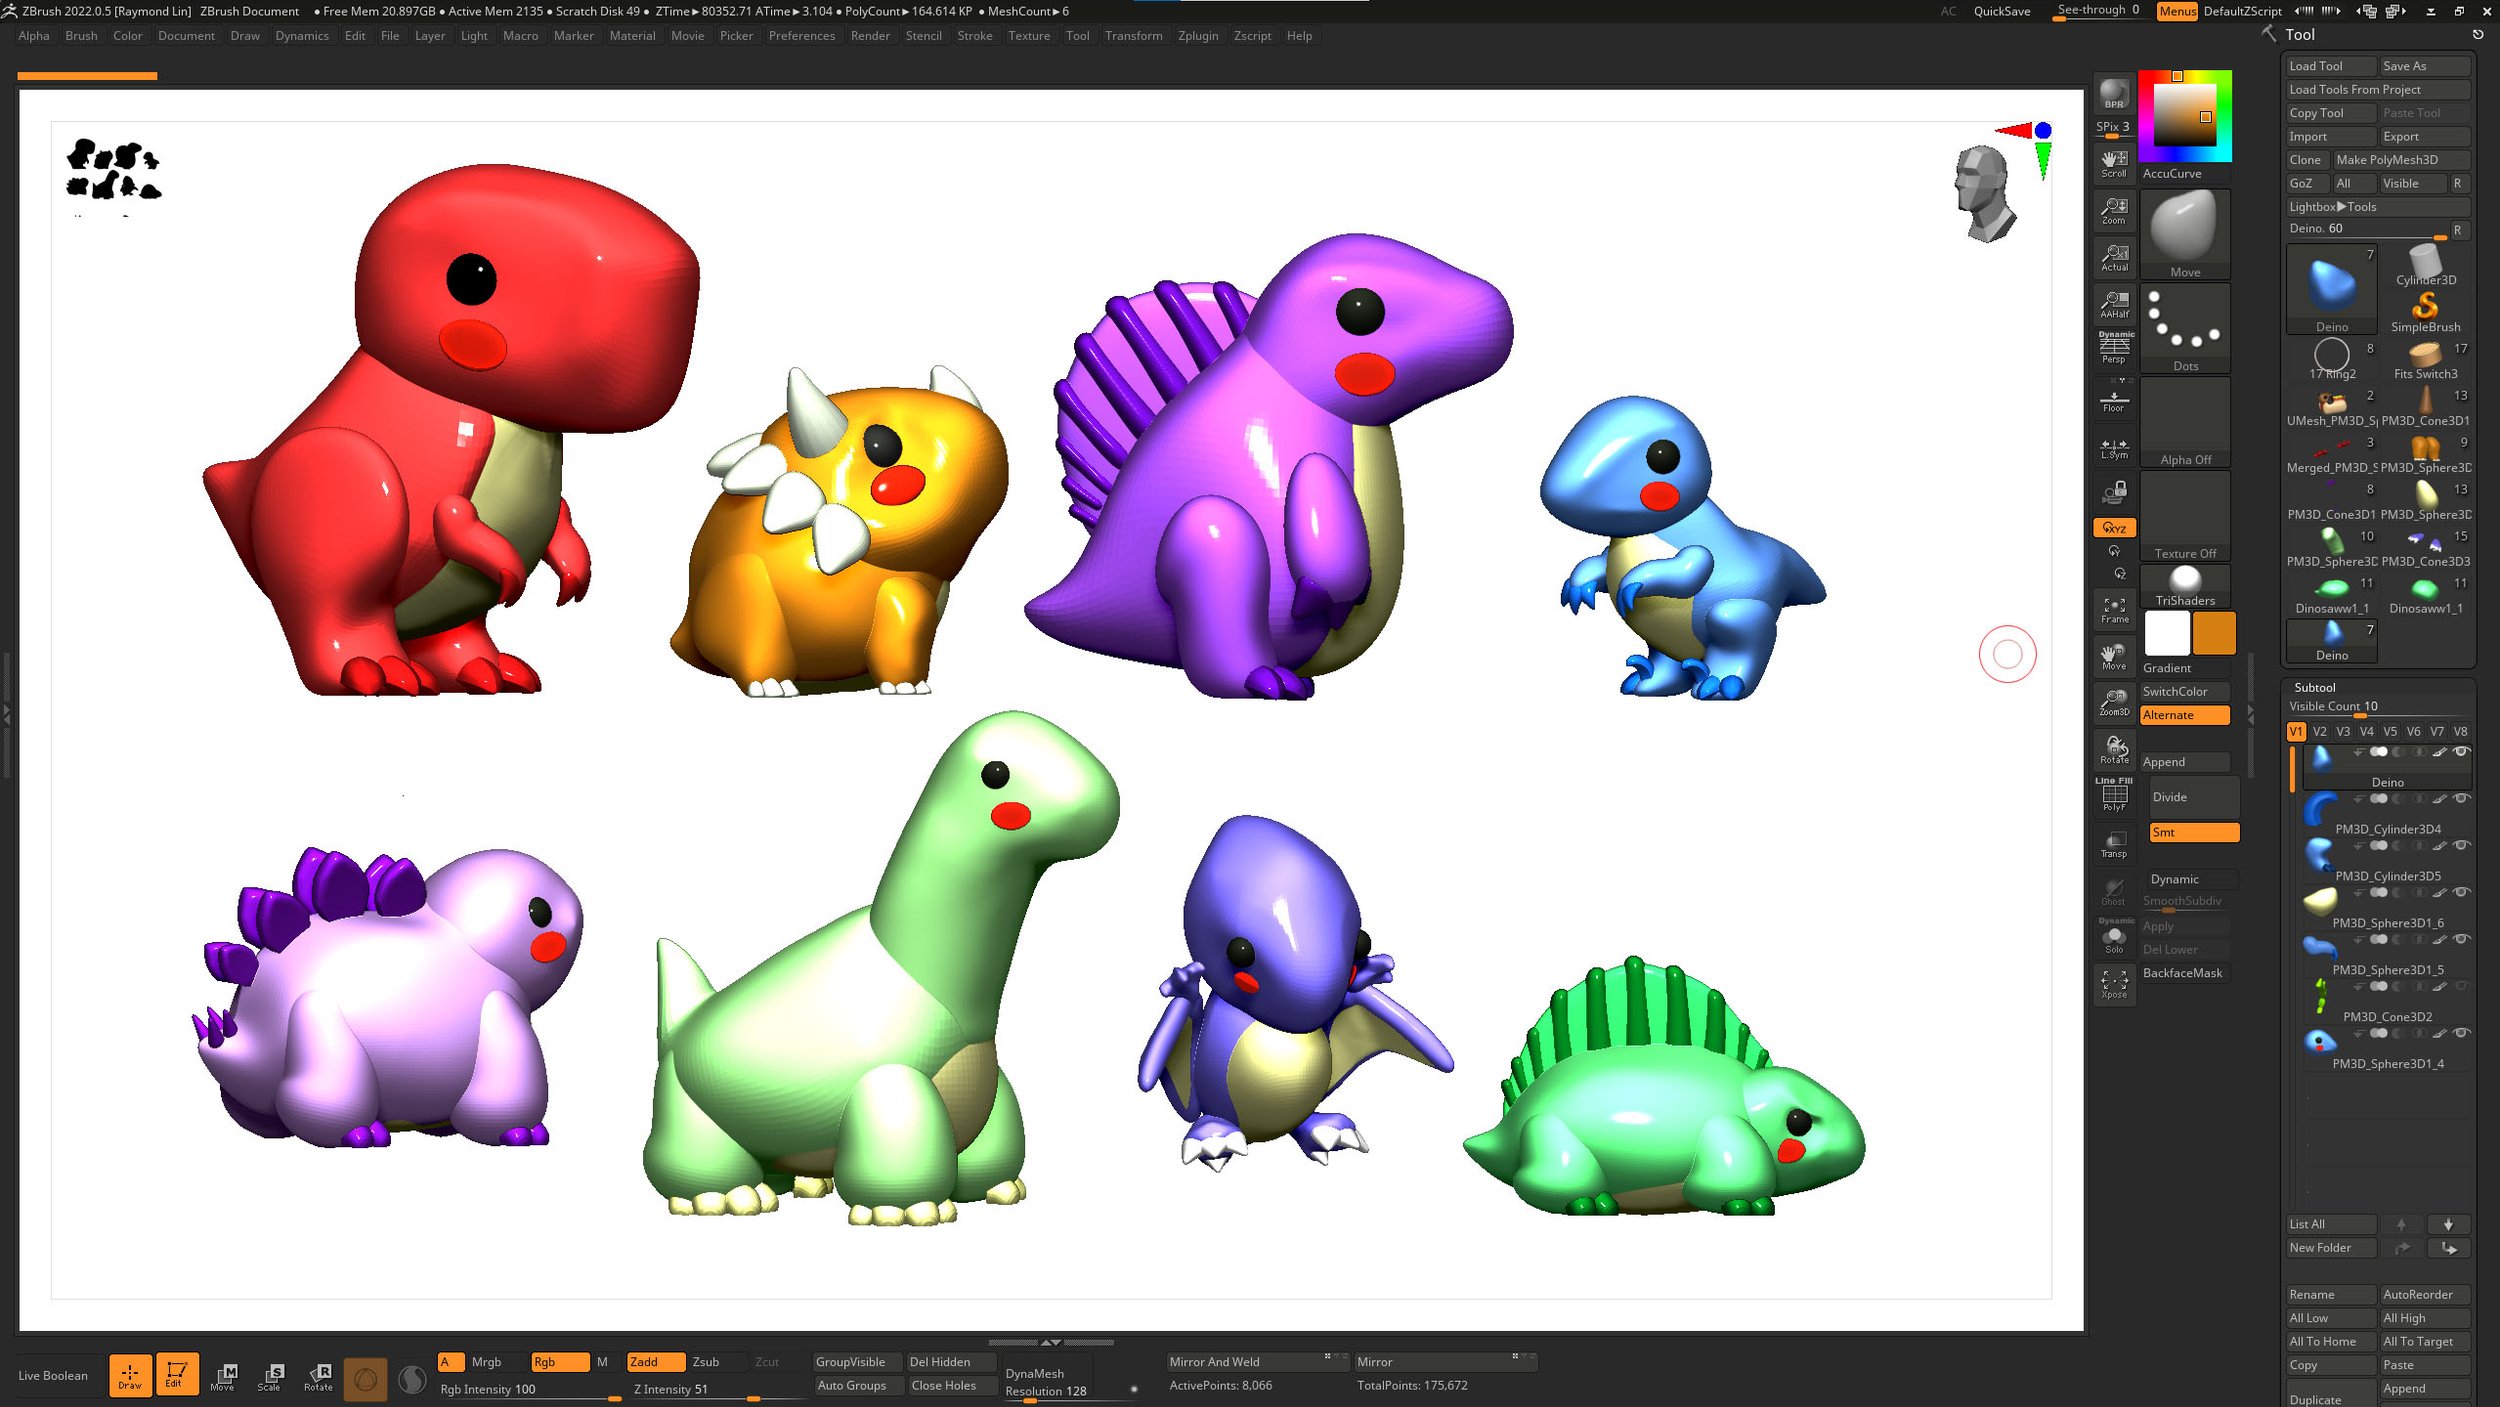
Side note - My nieces and nephews love dinos, So I designed these Dinosawwrs for them, and also for my inner 5-year-old self that never stopped thinking how cool it would be if they were still around.
I personally use this program for designing and sculpting for 3d printing using a screen tablet (and will go through all the ways I do that in a later post) Just know that because of the range of uses Zbrush has to offer, it can be awe-inspiring, or super daunting and can lead to analysis paralysis, or a mix of both.
As a beginner, straight away you’ll notice the initial UI is terribly confusing. But the good news is after you learn how to navigate the maze, you can create your own custom UI, so as to have it exactly how you like it. I currently use a Huion Kamvas Pro 24 2.5k and I love being able to customize my UI to my liking.
So If you’re looking to make digital art, characters for games, etc, and make sculpts for printing with Zbrush, You will have one of the most powerful tools in the industry.
But if you aren’t ready to drop $895 USD or $29.91/mo USD 359.00 annually (subscription based) for the full version and you’re looking to try your hand at sculpting you can try Zbrush Core Mini for FREE - just know that it is a very bare-bones sculpting program.
Now I have no real-world basis for this, but it’s probably safe to assume like a good amount of people that use Zbrush - probably don’t use all the tools it has to offer, much like how I have a DSLR camera and don’t know every setting, and shoot auto most of the time, BUT I like having the OPTION to be able to shoot manual if I ever wanted to invest the time to learn. If you feel seen by this comment, the full version of Zbrush might be for you! There are so many aspects of the program that I personally have not delved into - simply because I haven’t had to yet, like UV mapping and texturing.
Lastly, an unwritten rule of Zbrush was that if you paid for a license, you would get free upgrades since 1.0 but since it has been acquired by Maxon, even as a perpetual license holder, you will no longer be getting free upgrades. (Whomp whomp)
TLDR: Zbrush’s learning curve is steep. The UI is very confusing. It got a lot of features and the sculpting experience is top-notch. There are a lot of ways to create amazing art. I personally use this program to sculpt, design and iterate for 3d printing.
Pros
Free version basic version: Zbrush Core Mini*
Full Version Free to try for 45 days
The best sculpting software currently to date.
Auto Save Feature, Timelapse features, Rendering capabilities.
Powerful plugins such as 3d print hub, Keyshot bridge, and so much more.
You can use Zbrush for sculpting and Import into Blender for rendering!
Cons
*Zbrush Core Mini only saves as a ZPR file which means you will need the full version of Zbrush to convert it as an STL or OBJ if you want to edit it in another program like Blender.
Steep learning Curve. The UI is very complicated. ie. Why are the mirror and weld buttons under Geometry > Modify Topology and mirror buttons under Deformation?! Make this make sense.
The monthly subscription model.
Since being acquired by Maxon there are No longer free upgrades even with a perpetual license. (Thanks capitalism!)

Blender by Blender Foundation
What UI isn’t scary when you don’t understand what you’re looking at? If you dive deeper, you’ll see that Blender is a pretty amazing program that has gotten a ton of upgrades in the past few years that rival other programs (ahem Zbrush) It’s super powerful, and has 2d and 3d capabilities. You can model, and sculpt in it, Though I would say it’s stronger for modeling than sculpting. It also allows you to produce stunning renders. (Photo Credit: Blender Guru)
Best of all, it’s FREE. and you can get started today and try your hand at digital sculpting. I wish I could say more, but I haven’t had too much extensive experience in blender. However, I do have a friend in the game industry that designed every art asset in his video game called Good Knight using only blender to model everything. Just take a look at this bullet hell one-button game based on Filipino folklore!
Personally, I am excited to check out Blender for the grease pencil tools and isometric modeling capabilities to create really fun animations like artist kevandram does in his tutorial seen below.
TLDR: Blender does a bit of everything, 2D, 3D, animation, Rigging, and procedural modeling. And it’s FREE, not a trial. not a stripped-down version, the whole thing, is FREE. Studios have made short and even feature-length films using Blender. You have nothing to lose and everything to gain from learning how to do amazing art. I’m looking forward to sharing my journey in Blender for later posts. In the meantime, you can learn how to make a donut in this tutorial by blender guru too!
Pro
FREE Not a trial. not a stripped-down sample version, the Whole Program is FREE.
Massive online community Support - the blender subreddit is very helpful and there are so many video tutorials out there.
If you choose to join Blender Studio and access to all training, assets, and films for €9.90/month - much more affordable than going to any online or in-person class.
Open Source - know how to code? contribute to the GitHub development of Blender.
Sculpt, Modeling, and rig characters for animation and games all in one program
Con
Steep learning Curve (what program isn’t hard at first?) But if you’ve used others programs that can help you learn this one faster.
Generalist program - Not the best at any one thing, but it can do a lot of things!
Nomad Sculpt
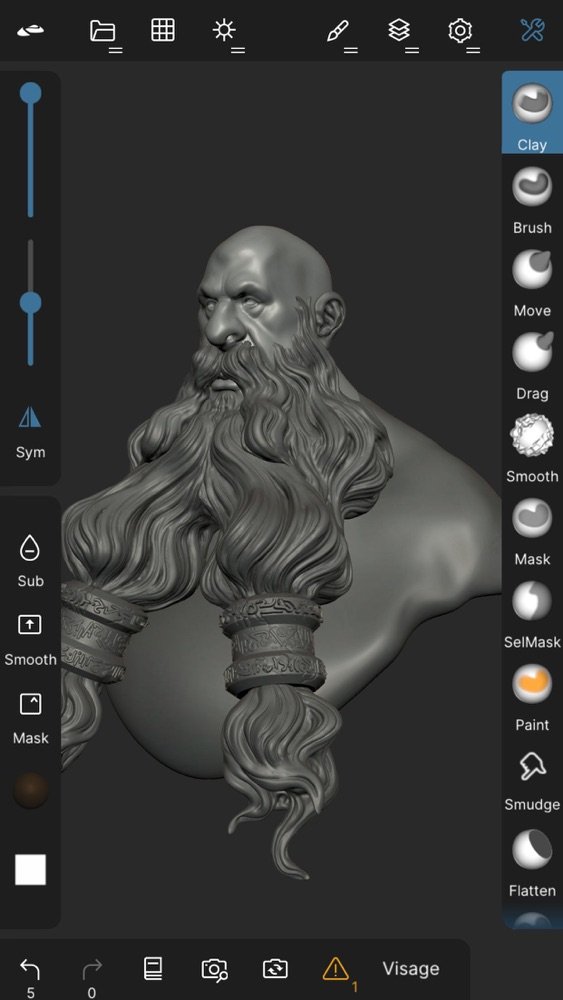
This might be the sleeper hit of the three programs I’m sharing today. Developed by the makers of Sculpt GL, a browser-based sculpting software. They’ve made basically the tools you need for sculpting to work for an Ipad, android, or tablet pc. All you need is a stylus or your fingers, with this app now you can use both. With one hand you can resize brushes, change intensity or even choose different brushes on the fly and use the stylus to sculpt simultaneously with the other hand for a very intuitive sculpting experience. It works on both android and IOS and you can even try it on your pc using Blue Stacks emulator.
(photo credit - NomadSculpt)
As someone who paid for a Zbrush perpetual license (~$800) back in 2012ish? I love that this new option is available for creatives now. We didn’t have a choice before but now there are so many options.
TLDR: Nomad has really everything you need to sculpt for 3d printing - Import files, sculpt with layers, render with lighting setups, and poly-paint, and have turn tables to show off your final sculpture. It’s a super powerful sculpting program that’s very intuitive and you can take it on the go as it’s built for tablets. For the cost of a meal, $16 USD, it’s a no-brainer.
Pro
Super Affordable on almost any budget.
If you’ve used any other sculpting software before, the controls are very intuitive.*
You can sculpt with both hands. One holding the pen and one navigating the touch screen as you would on a phone.
Remeshing, Split and Post Processing tools
You can always import files into other programs like Zbrush and blender and continue to work on them further.
It’s not owned by Maxon, unlike the Forger app.
Con
It’s a strong sculpting program but is still limited by the hardware, so beware of doing something too high poly, it can slow down your system.
If you’re using Nomad on non-native emulators, some features are buggy.
TLDR: In conclusion
If you’re interested in where to start sculpting - I highly recommend taking the time to try ZBrush Core Mini. Do not feel bad if you’re terrible at it. I was too! It’s all part of learning.
Get used to how the brushes and features work. Push, pull, stretch, play. Judgment free!
Learn to navigate moving around an object floating in space.
the UI is actually simplified so it’s easier to understand than the Full version.
And then when you feel more confident -
Follow the tutorial to make a donut in Blender
Learn step by step about modeling so you can manipulate polygons around in a different way than sculpting.
Get a good understanding of what rendering is so you too can create beautiful donut art (or any art in the future!)
And if you already own an Ipad or similar tablet - get Nomad Sculpt from the app store for only 16 dollars USD and combine all the previous skills you learned!
Another digital perk is that you don’t have to be locked into a single program and can use a workflow to get the best of all the programs have to offer! For example: Use nomad to sculpt on the go, ZBrush to finalize the details, and Blender to make renders.
Now for the intermediate and advanced artists that want a deep dive into in-depth mastery from industry artists that have specialized in their vertical for years, I defer to masters such as Pablo Munoz Gomez or Michael Pavolich for Zbrush or Blender Guru for Blender.
I hope this post was helpful to share my experiences as a traditional artist navigating digital sculpting.
In the meanwhile, check out some other posts below!
Ray @ AsianJoyCo

What kind of tablet is right for you? An intro to the tools for digital sculpting and modeling…

Quality of Life Upgrades for Creatives: Part 1
You only got one body for the rest of your life. Treat yo’ self!
Ventilation Upgrades for 3D Resin Printing
Print safely without the resin fume smell!