
Cleaning used IPA/Waste Water/Solvent
Recycling, Reuse & Waste Disposal
Updated 1/08/2025
As makers, we share what we research, test, and use. If you decide to purchase anything we mention using our referral links, we may get a small commission at no cost to you. If you’d like to learn more, visit our affiliate policy.
To start, this post is meant to be a starting point for anyone looking into what to do with their used resin/IPA/solvent disposal and or recycling. This is not the be-all-end-all definitive of anything. If anyone has notes to contribute, feel free to get in touch with me on Reddit (r/nycraylin). This is not a sponsored post, the brands mentioned are based on my own and trusted peer experiences. Cool? Cool.
And now, on with the show, Cleaning used IPA/Waste Water/Solvent: Recycling, Reuse & Waste Disposal.

Jump to TLDR: Cleaning Used IPA
Now that you finished your first bottles of resin you have a good understanding of how much waste is made and how messy this hobby is. If you’ve been printing for longer - You probably already do all this but just in case here’s a quick rundown of what to do with that waste.
Resin Waste Disposal
Just to be clear. If you’re unsure please consult your local Municipal Waste Management for their official protocol on hazmat disposal.
But for the most part, this is how it usually goes down on my end. I got resin-soaked shop towels and trimmed supports, and let’s be honest, probably more fails than I’d like to admit, (especially when working on something new) stuffed in a small 4.5 liter Step Trash can like the kind you use for the bathroom. I use clear bags like the kind you get at the fruit/vegetable stand. Everyone has their own methods, it’s usually some version of the method outlined below.
Clear plastic bag + outside in the sun
Mix around for a few days so it cures evenly.
Toss it with the regular trash.
What about the dirty Isopropyl alcohol, wastewater, or other cleaners/solvent? How do I make that reusable?
If you’re used to decanting your IPA, and skimming the top after the resin has settled, and if that’s good enough for you. Keep doing that. This method is quite a bit more involved in doing all the steps to “recycle” IPA vs putting it outside and letting it evaporate in a bucket outside the sun. Long story short, you’ll need drip filters, buckets, and patience. My takeaway is depending on how involved you want to be (Spoiler alert) - it might not be worth your time. But I’ll walk you through what I did and let you be the judge.

You know, Time? the only truly limited resource you have? This makes doing this write-up somewhat of an exercise in futility. 😂😭 Oh…
If like me, you’re in the US, 4 gallons of IPA is $67.94 ($0.13 / Fl Oz As of 01/08/2025 with free shipping to your house through Amazon - you don’t even need to drive anywhere or wait in line. So that’s not bad at all really, cost-wise. But if you’re in a part of the world where it’s tough to get affordable IPA - recycling might be the move. You’ll also want to use the Two-stage washing method to save IPA.
What is the Two-Stage Washing Method?
Regardless if you’re recycling IPA or not. I highly recommend Two-stage washing - here’s the gist. It’s a simple and effective way to keep your IPA/Solvent or Wastewater cleaner for longer. Two-stage washing means the bulk of your IPA will be clean for a longer time. Let me highlight some of the Do’s and Don’t’s for this process.
❌ Don’t just stick your dirty prints straight in your resin wash machine and expect that to be perfect, it won’t be. And you will end up annoyed at how quickly the IPA gets dirty. 😡
✔️ Do get a separate small container (anything with a silicone gasket will work).
Step 1. Take a soft old toothbrush so you can scrub your prints, get into all the nooks and crannies before you run them in the wash and cure unit. I like doing this while they are still on the build plate, so the print doesn’t float around - especially if hollow. The wham bam plate allows me to wash them really easily and transfer that into the wash station. This step keeps your main IPA cleaner for longer because most of the resin will come off during this stage.

Step 2.
After brushing them clean in your first IPA bath, run your prints in your washing station, or ultrasonic cleaner if you went that route. Depending on the size I run it anywhere from 3 - 6 minutes. I use the Mercury X filled at 4500 ML - 5500 line.
Let them dry out and in a vented area because prints are off-gassing. After drying, remove your supports and sand them. I like to do a 3rd wash of IPA after sanding to remove the dust as well (More on this in a dedicated workflow post later)
Wash and Cure Machine PSA: I personally wouldn’t use water or anything but 99% IPA in the wash station. It already says so in the manual, but for some reason doesn’t say why exactly - here’s why. It can rust the bearings of your propeller because steel + Water = Rust. Some people have reported that they use water and have no problems. Perhaps manufacturers have started using aluminum parts - which don’t rust. Do whatever you’d like with that information I’m just sayin’.
So what do we do with the dirty IPA/ waste water/solvent that you used for prewashing?
Recycling IPA, Waste Water, Solvents: Reuse & Waste Disposal.

Yes, it’s a pain to recycle but I wanted to see if I could, so - for Science*!
I had all these bottles of used IPA sitting around and I wanted to find out if I could recycle it, so I did and can show you how to if you want to see it it makes sense for you too. *This is my not-very-scientific attempt.
Here are the 2 methods, I’ve tried. Feel free to take what works for you in this write-up. I’ll outline what it takes and you see if you even think it’s worth your efforts. If you think you want to try - keep scrolling down and see some pictures of what I did and the Set up of the Gravity Filter Bucket - which I made based on Nerdtronic’s video about Can We Recycle 3D Printing Alcohol? This build is based on their experiment, so definitely want to shout them out for all their efforts!
Work Flow Tip: Easy color coding reminder to wear PPE before handling.
Red tools for Stop/Danger. I use a Red lunch tray for uncured materials.
Green tools for Go/Good. Green lunch tray for cured materials.
1. The Gravity Filter Bucket Method
Costs about $50 USD - $40 for the filters online and $10 - $15 for the buckets locally and LIDS ARE A SEPARATE COST NOW. Thanks, Capitalism.
It takes time and effort of building it (the first time anyway)
Waiting for the used wastewater/IPA/solvent to filter
Pumping the “filtered” stuff from the bucket can be messy.
Expose that to the sun in a clear bottle,
Repeat the filtering/exposure to the sun process a few times.
Put in a container for later use.
The resulting filtered IPA is good for prewashing your prints before putting them into the wash and cure machine.
and…
2. The Tried & True Regular Degular Bucket Outside Method
Is a bucket outside. (with a screen - so birds/animals don’t get into - just in case)
Toss cured resin after scraping it out of the bucket in the trash for disposal.
Can be harder to do if have wastewater in winter because… well, winter.
Doesn’t allow you to reuse your IPA, but you save all that time by not having to do all the work to do that.
All you need is basically a bucket (and a screen just in case you get wildlife etc that can get into it), and.. the sun.
The main issue is if you’re using water, it’ll take way longer to evaporate so plan accordingly. Also please don’t pour cured/filtered water down your drains at home or storm drains as those feed directly to local waterways.
Any other methods?
There is a wildcard method with a distiller - which I haven’t tried nor am not invested in doing because that involves making vapors and more things to buy and I don’t have the chemistry background to not blow up my space. But some users have reported works for them when they put their wastewater from using water-washable resin in there. Will report on that more when I get more details. but for now, There is no cow level (diablo 1 reference anyone?)- until proven otherwise.
Ok, so you still want to recycle IPA/WasteWater?
A Step-by-step-ish guide:
1. Build the gravity bucket filter.
Basically, you have 4 filters and 3 buckets. I used 2, 2-gallon for the first 2 and 1, 3.5-gallon bucket with a wider base for more stability. Marked the holes, and used a spade bit to make the guide holes. Screwed them into the middle bucket’s lid and the bottom of the top bucket. Repeat for the middle bucket and bottom bucket’s lid. Screw the filters in place and close the lids to make sure they don’t leak.
I skipped the documentation of the build process because it’s drilling holes in a bucket, and that’s boring. (Dad joke? but also true) Below is what it should look like. More pictures below of the inside so you can see the components.
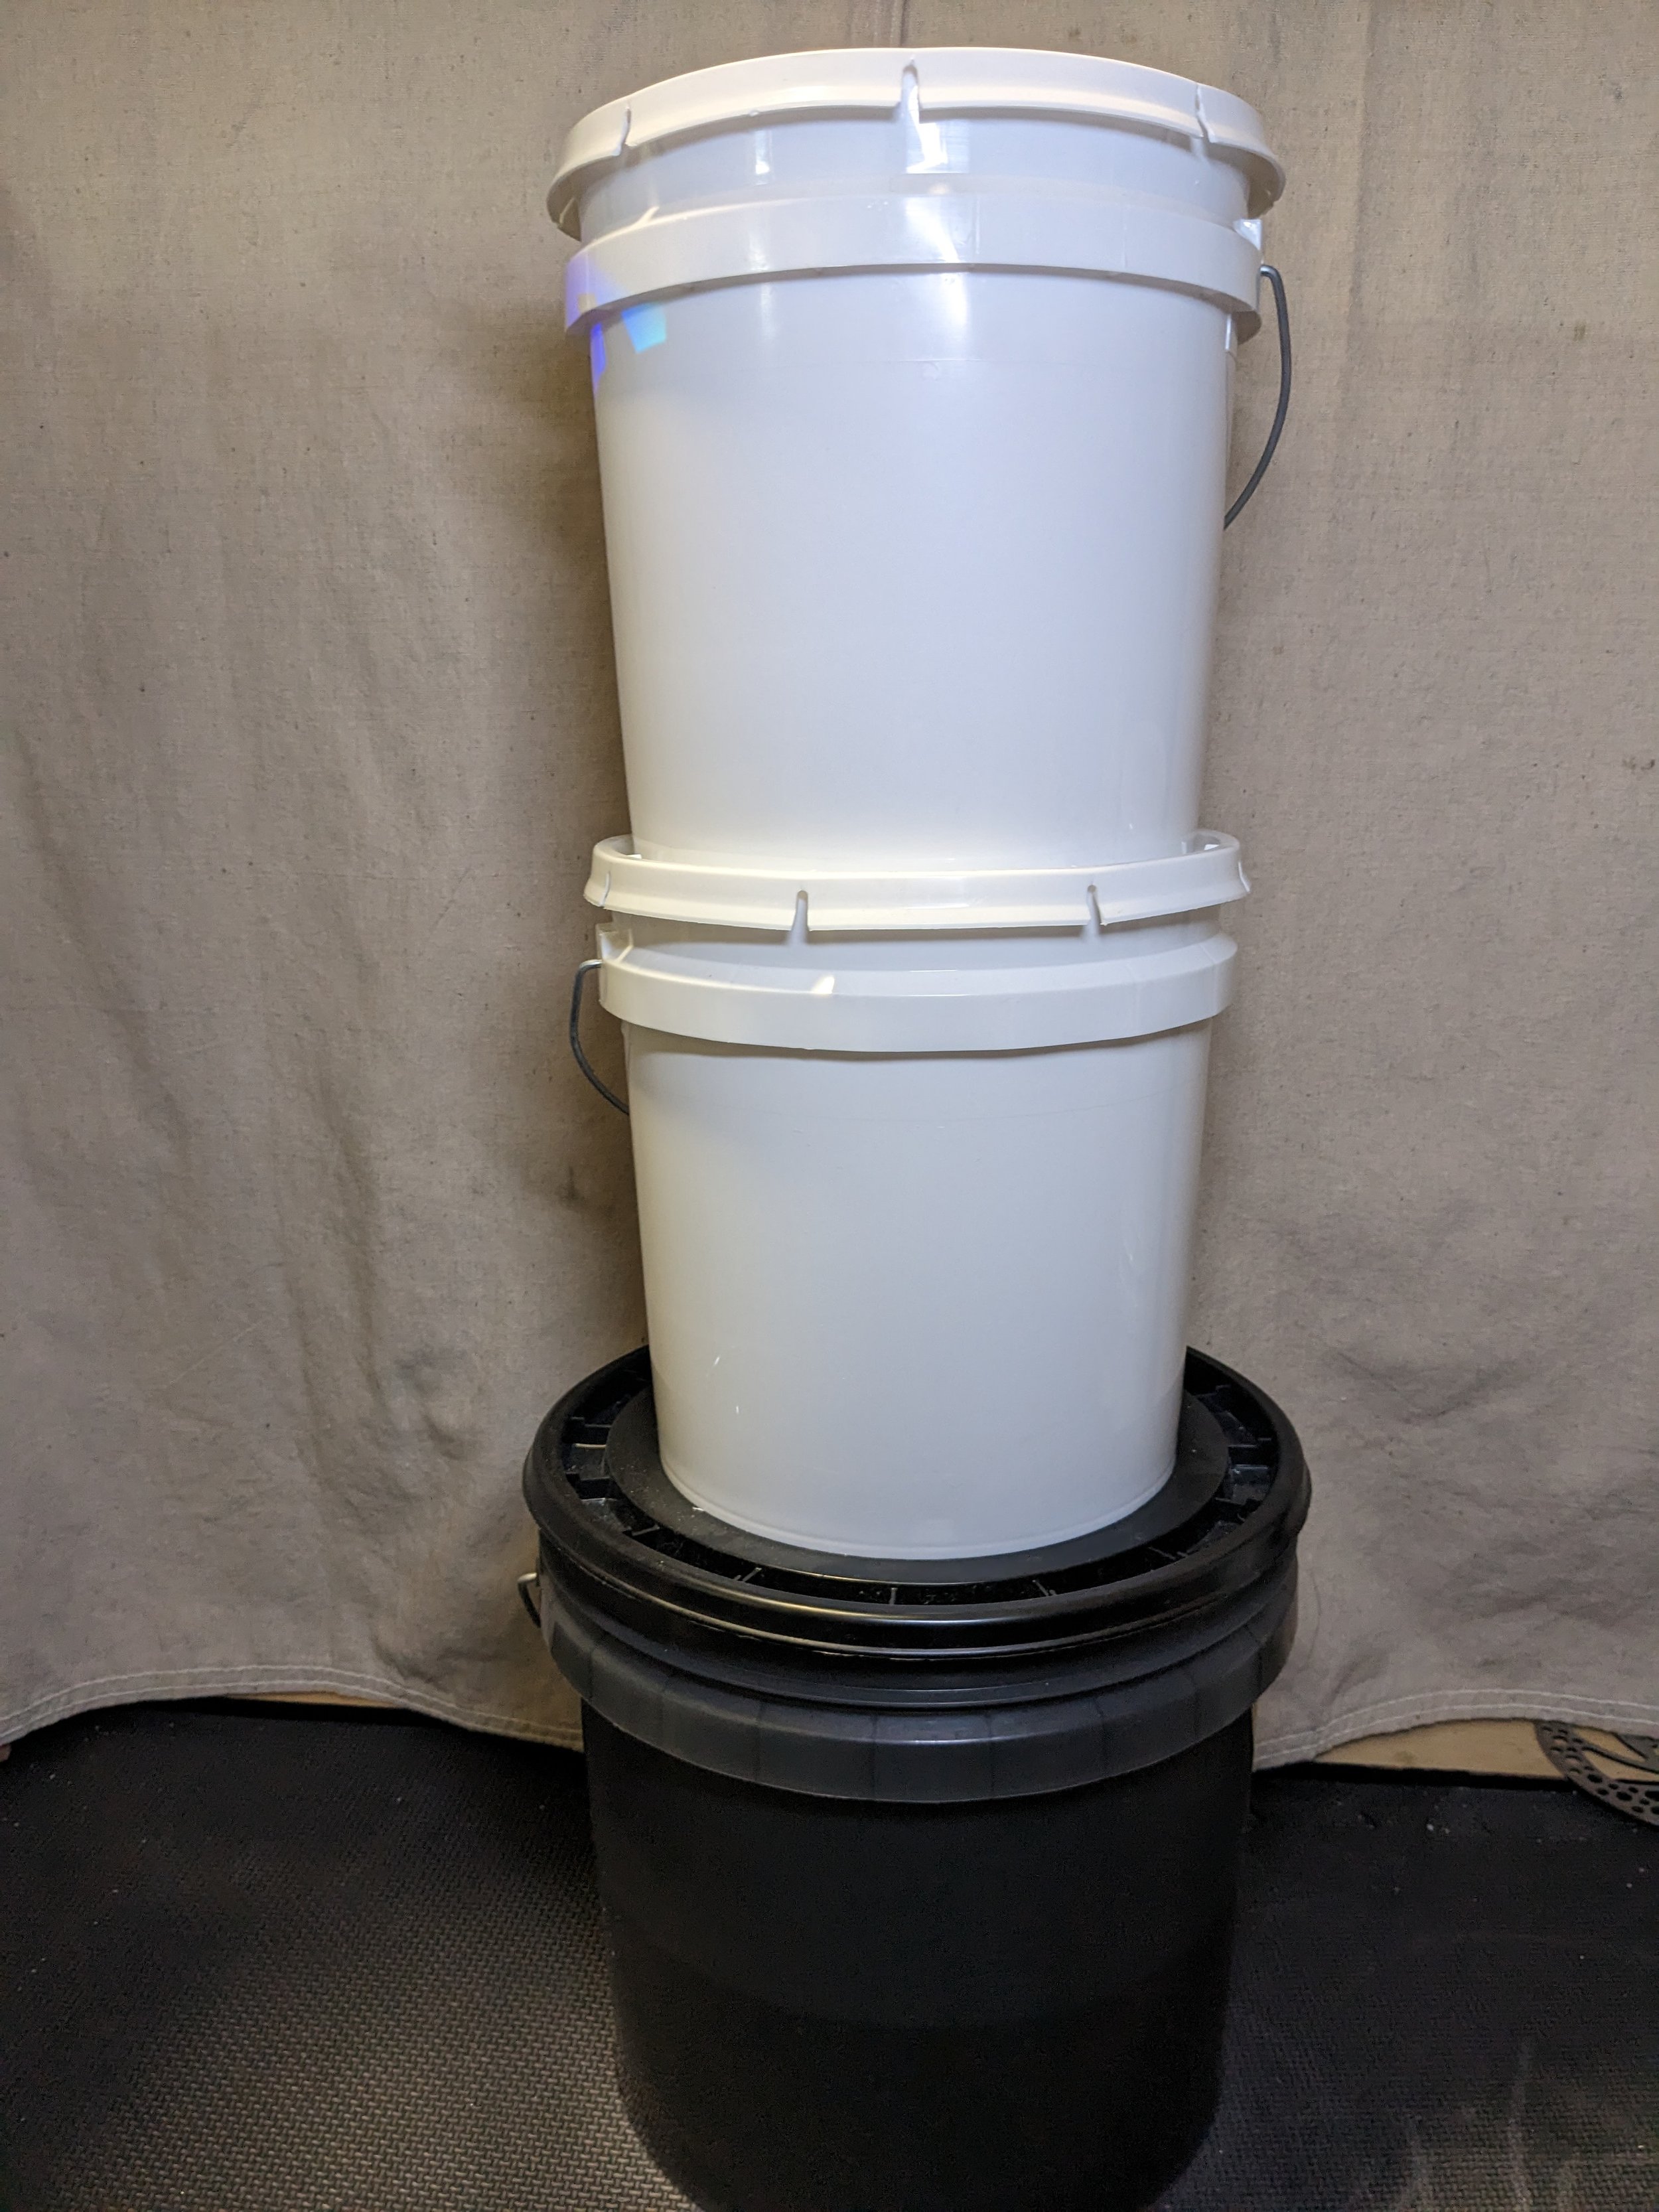
Behold! The Gravity Filter Bucket
BAM you’re done and depending on how fast you are, maybe half an hour or so - well spent, maybe.

Reminder
It’s dangerous to go alone, take this!
Equip your PPE when handling larger amounts of resin waste (eye protection, gloves, sleeves, and or apron, etc.)
+ Splash Damage Defense.
+ Lung Protection.
+ Vision protection.
+ Hand protection.


2. Collect your dirty resin/ipa mixtures and expose them to the sun.
This container was used for 2 stage washing. It might get sludgy or solid depending on the concentration of resin to IPA. You’ll know when it’s too much resin when it becomes more solid than liquid. At that point, break the membrane and see if there’s IPA under the surface if so you’re good, if not. It’s too much resin and you’re probably better off taking the L and letting that batch cure out in the sun. The batch pictured here had too much resin and couldn’t be reused.
3. Filter it. I do all this inside my ventilated enclosure. I don’t let the vapors build up - the air is always moving and I close the flap when I’m letting the IPA filter. The following is what that process looks like after the resin has been exposed to the sun in bottles. If you’re using a large container I’d suggest pumping that into smaller bottles so you can cure the mixture more evenly.

Curing bottles
Here’s what bottles of filtered vs nonfiltered look like lined up in the window. The sludge sinks to the bottom.
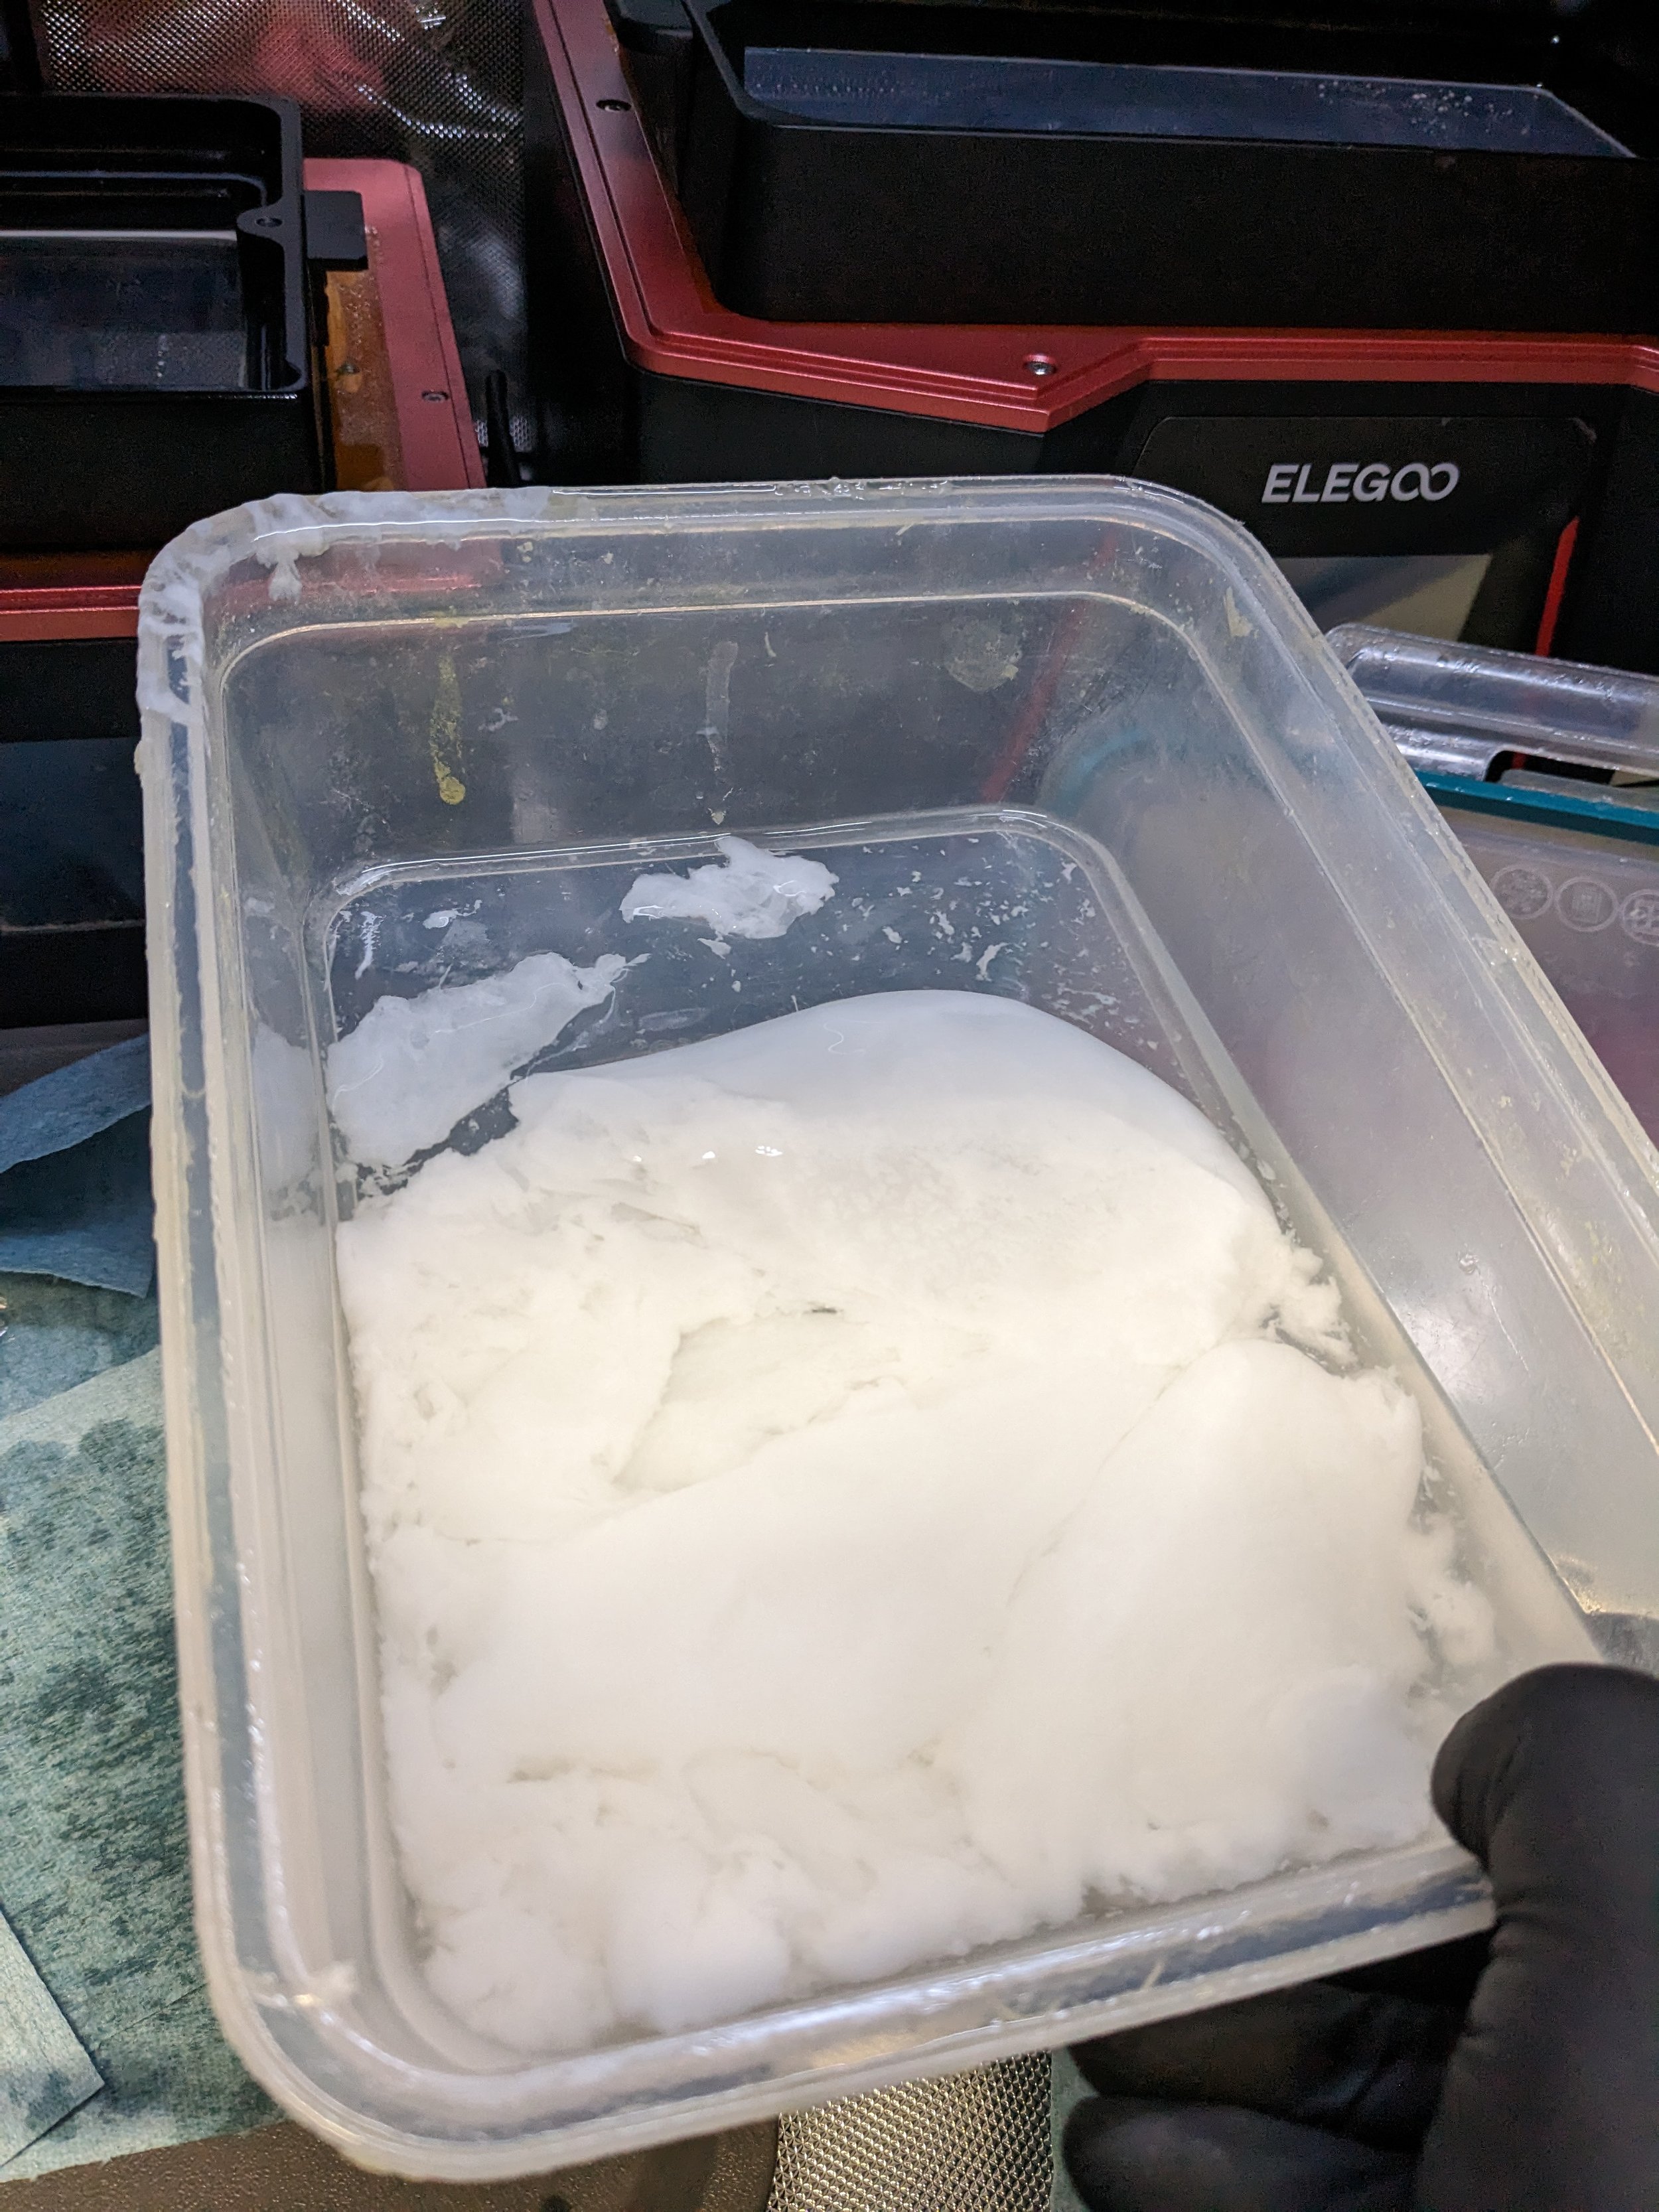
The Sludge
This is what’s left over from the Prewash tub filtering a bunch already (used for step 1 of two-stage washing) that has been exposed to sunlight for about a day or so. There was a layer of IPA on top that separated out. After breaking the membrane, it has the consistency of Taho (Tofu) pudding. This was clear resin btw. Your sludge might look different based on the color of your resin. I used a combination of clear and white tinted resin.
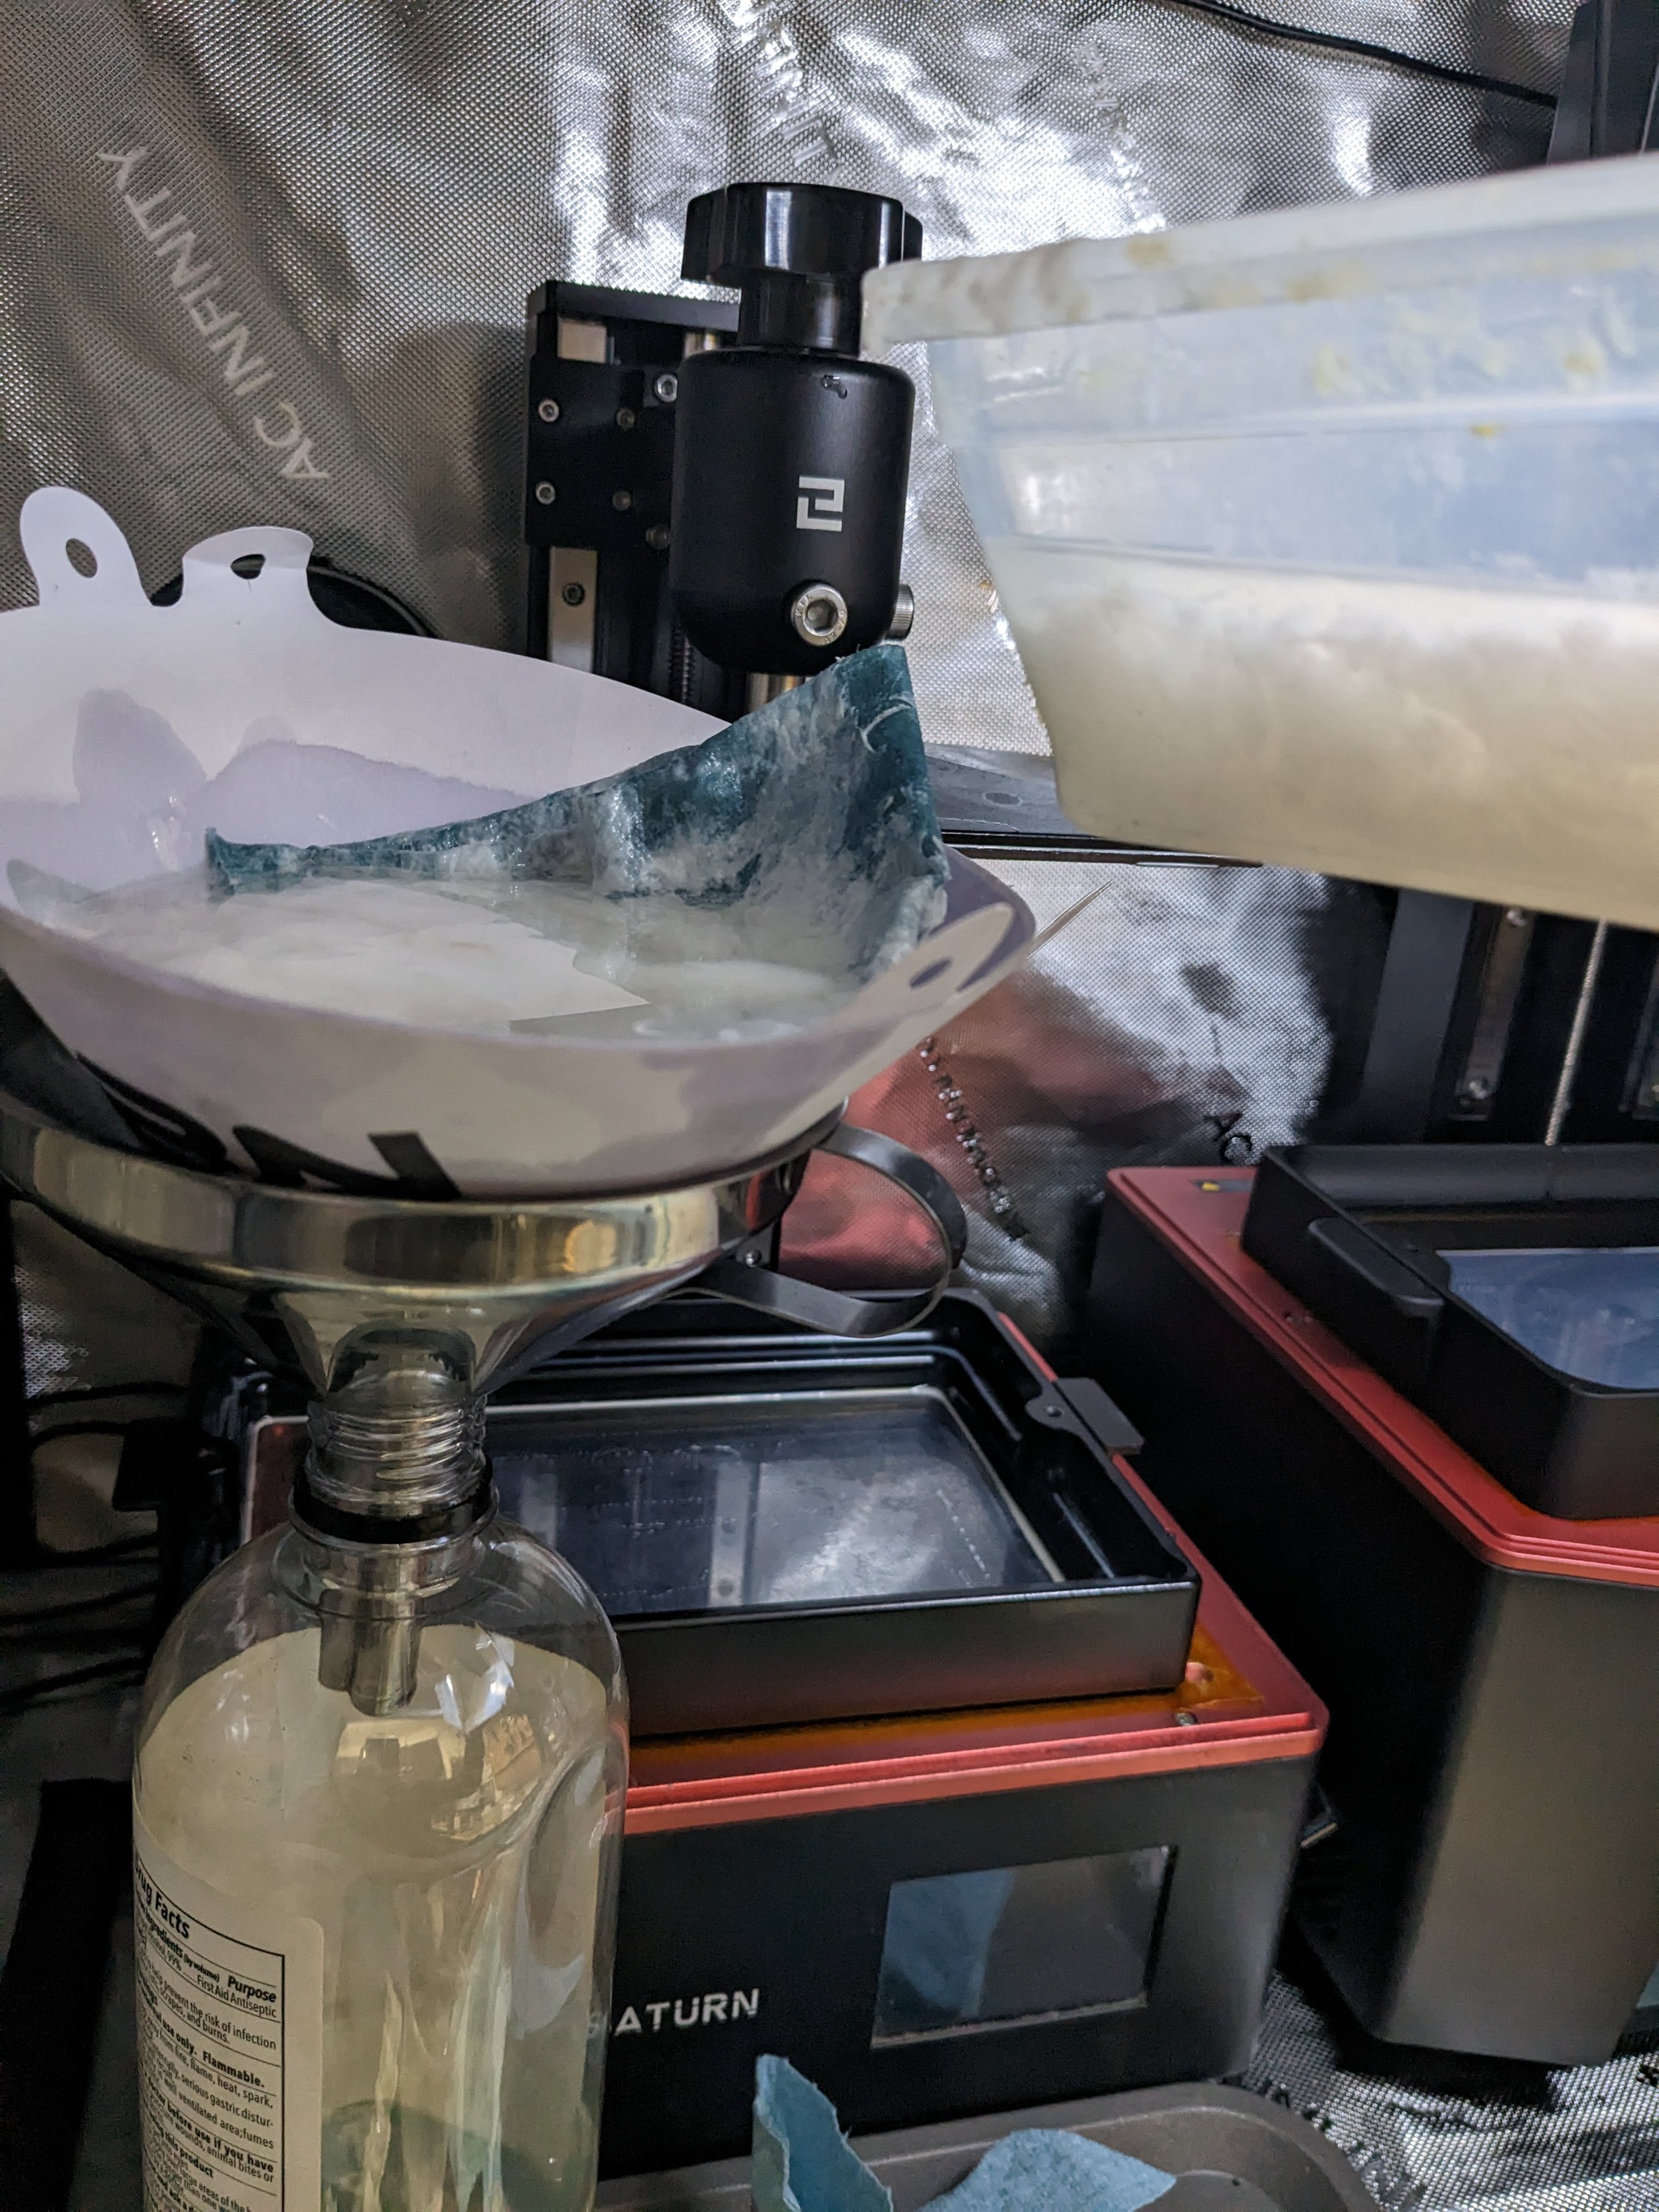
The Pour
I use paint strainers with a stainless steel funnel and a 1/4th of a blue shop towel. It filters the resin chunks.
Keep the remaining IPA waste covered.
Close the tent, Let that vent/filter.

4. Repeat
Do that a few times. I did 3 passes. Throw all the spent filters in a clear bag - outside, sun, cure, mix, cure, then dispose of.

Clear-ish! We done?
I mean I know it looks clear, but I’m going to leave it outside again - you’ll see.

Clear-Ish
As you can see, there was still resin in it. Obviously, it’s WAY better than when we first started but just goes to show you, that filtered and clear-ish - doesn’t mean it’s done. I don’t think it’ll ever be fully clean but this is good enough for pre-washes.
Filter this again - strainer/blue towel in the next step.
5. Gravity filter buckets. Pour your filtered resin here.
This is what the inside of the top portion of the bucket looks like.
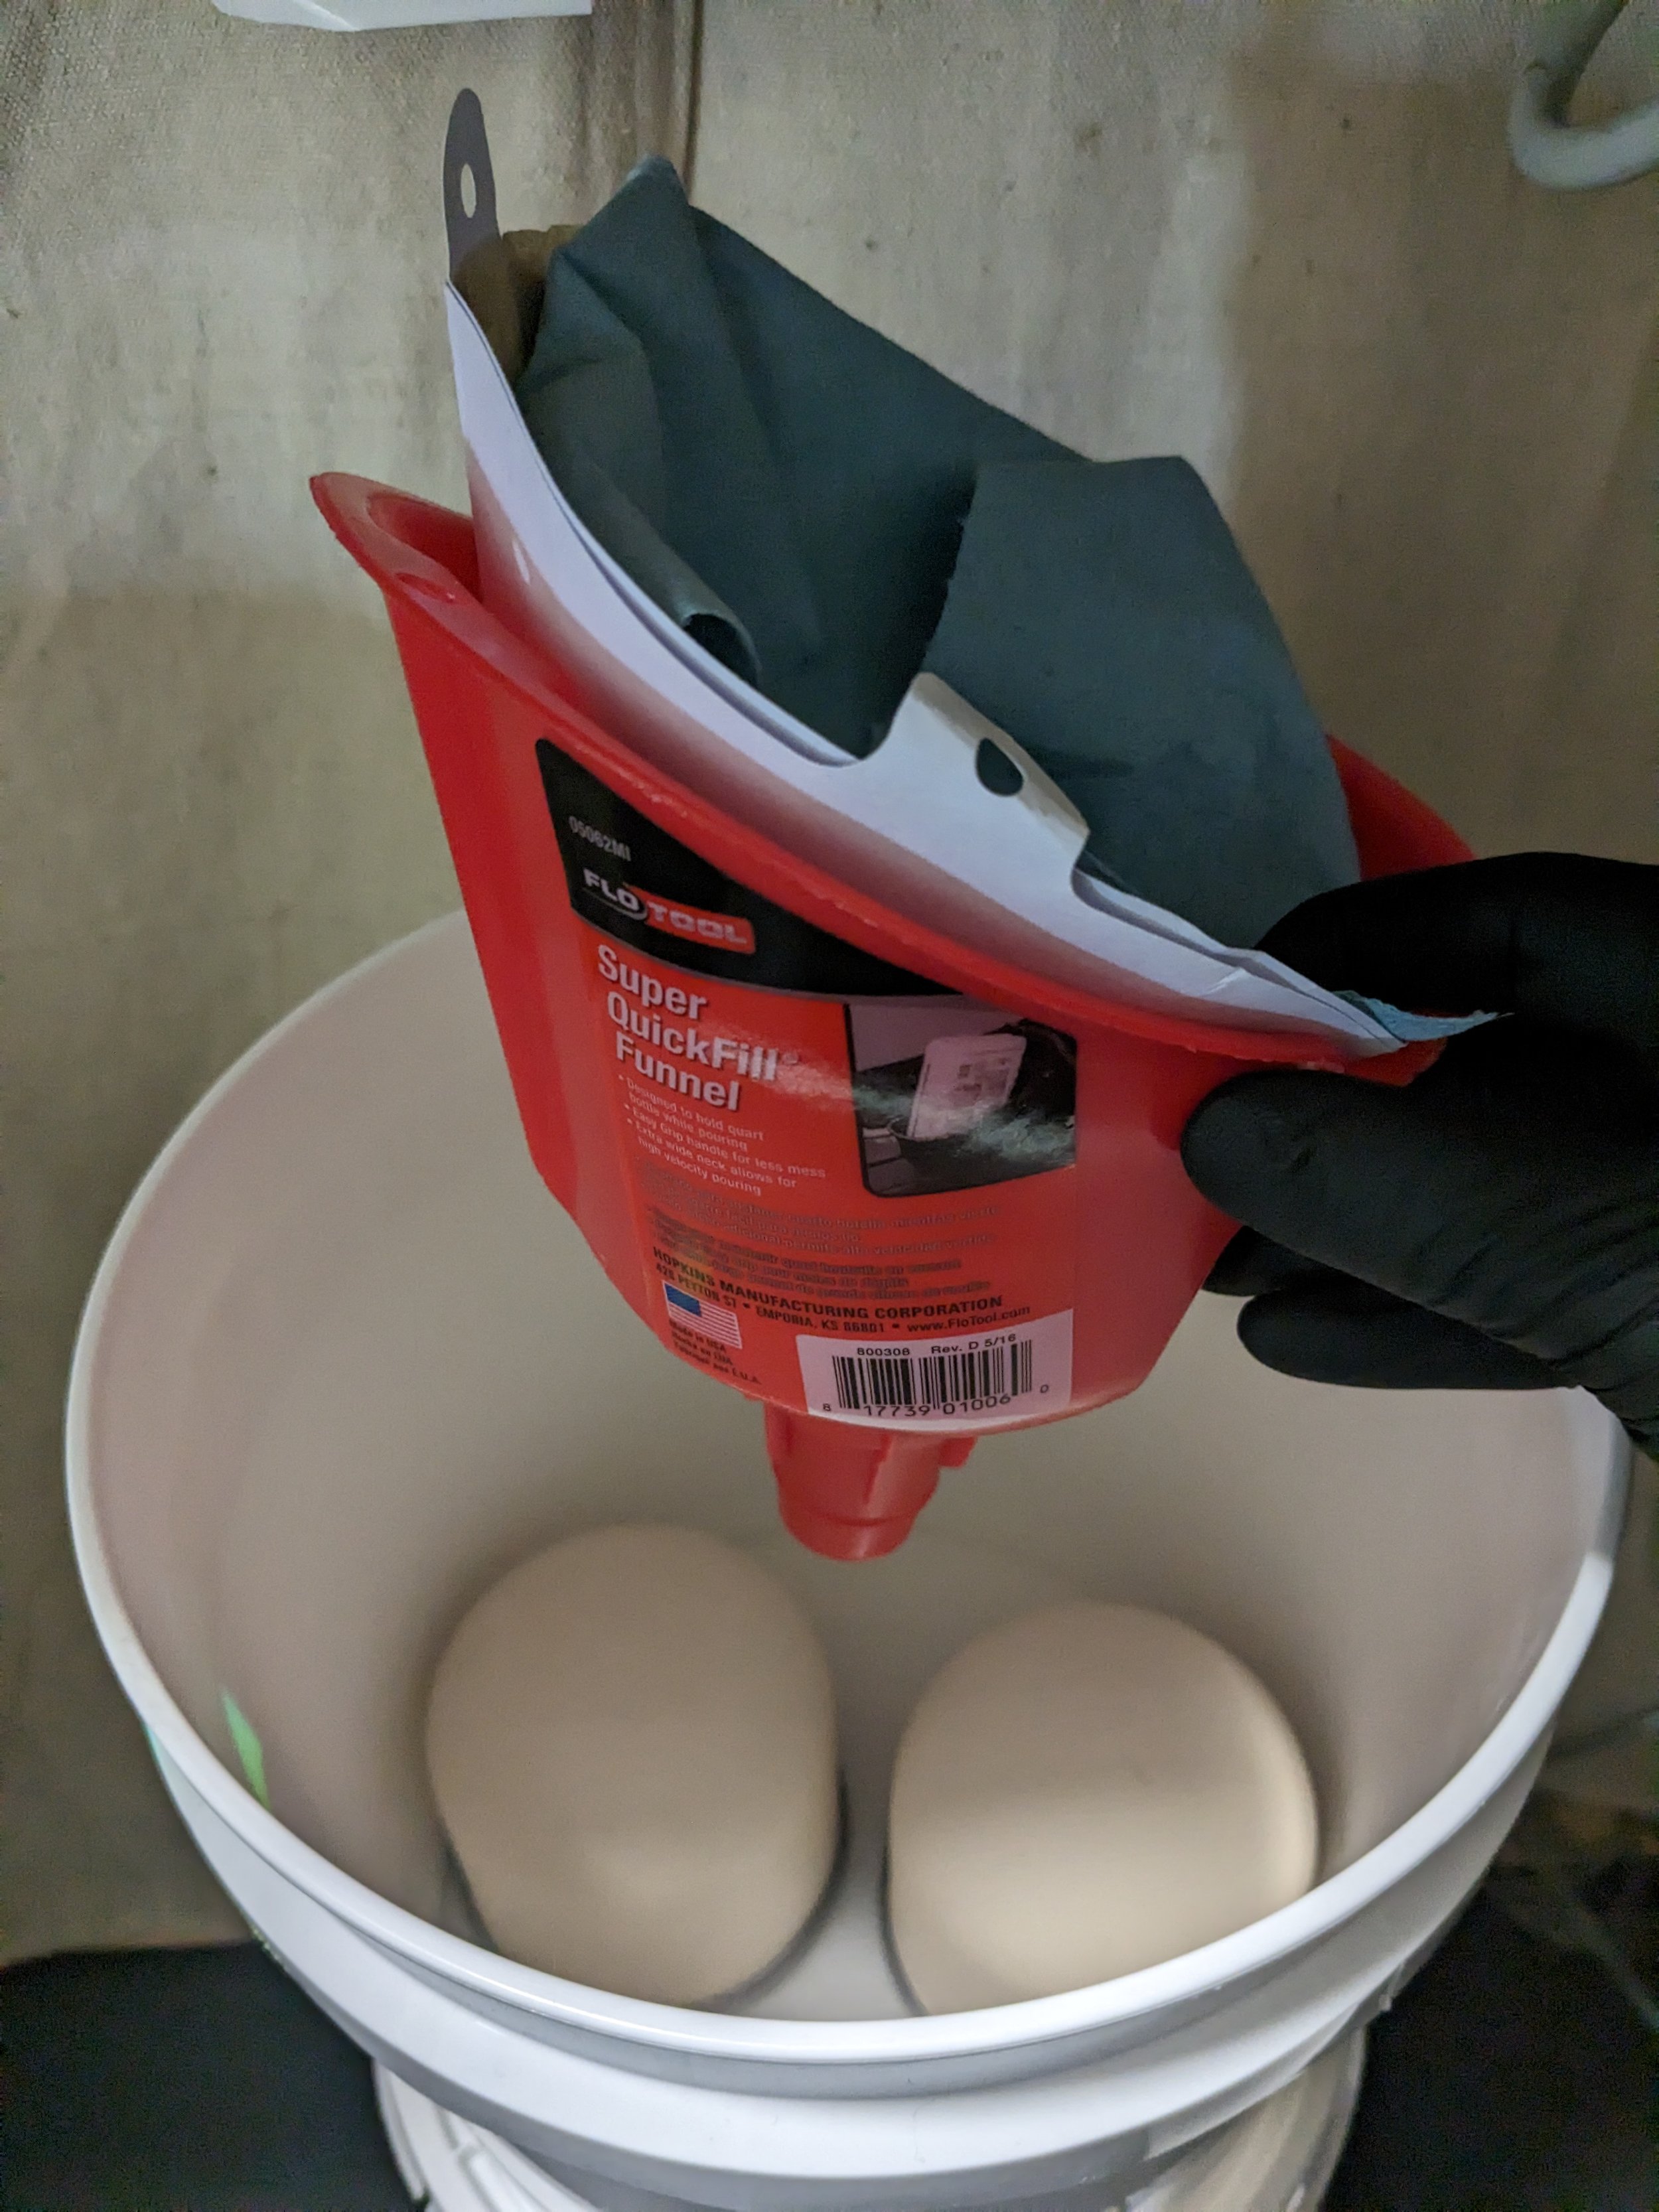
I use a Quick Funnel with Paint Strainers, paper coffee filters, and a blue shop towel as the last filter point for before it hits the ceramic filters. The 2 filters leave just enough space on each side to hold the funnel upright

Underneath the first set of filters.
Primer your filters with clean IPA, It takes a few hours to filter through. There are 2 sets of these filters.

The second set of filters
Goes into the final bucket. After the IPA is collected. It’ll settle there and then you can pump the filtered IPA into your bottles. Mark them with an X so you easily identify it from fresh IPA.

Warning:
Do not just try and pour filtered IPA from the bucket into funnels, You will probably spill it - leading to a huge mess and a waste of time invoking much anger and frustration.
Ask me how I know! Learn from my mistakes, folks.

Marked Filtered Bottle Of IPA
It’s pretty clear after that. Even after being exposed to the sun, it takes a few passes, but it gets mostly clear again. But can retain dyes and colors if your resin was tinted. Be mindful not to use tinted IPA (such as yellow, green etc) to wash white or clear prints as they can leech colors onto your print if you don’t wash them thoroughly. Other than that. You’re good to go.

The more you know!
The final product can then be used for prewashing. It’s probably not worth your time doing all this but hey, now you know! I’d suggest using fresh IPA for the final washing. You definitely don’t want to have waited 10+ hours for a print to finish to just cheap out on the final wash and ruin it by not cleaning it enough.
Most importantly keep in mind, none of us are getting off this rock unscathed so stay safe, spend your time how you best see fit and have fun with your resin prints!
TLDR - Cleaning used IPA/Waste Water/Solvent
Recycling, Reuse & Waste Disposal
Whether it’s worth all the effort to reuse IPA is up to you. I find the opportunity cost (time/effort) to be a lot for what you get. For 4 gallons for ~$70 USD - which lasts a long time depending on usage, I personally think it's worth just buying new bottles of IPA but hey, this is definitely an option if you’re curious.
The Gravity Filter Bucket Build list
If you want to try and recycle your IPA, the build is pretty self-explanatory, I assume if you’re a DIYer like me you have stuff like drill bits and a drill, but yeah use that to drill your holes, etc for the buckets. but here are some of the things I’ve used for it if you want to build your own. Basically, you have 4 filters and 3 buckets. I used two, 2-gallon for the first 2 and one, 3.5-gallon bucket for the base. Drill through 2nd bucket lid/bottom of the first bucket and the bottom of the 2nd bucket/top of the 3rd bucket. Screw the filters in place and close the lids to make sure they don’t leak.
I suggest sourcing your buckets locally, because it costs way less than buying them online. As for the rest I’ve found on Amazon.
Blue shop towels
You will go through a lot of these, wiping down your work surface, cleaning prints etc. I cut each sheet into 4 so I get more uses out of them.
This is for cleaning your area, filtering resin, and drying off prints from extra resin.
Ceramic Dome Water Filter 4-Pack
These are the filters you put in the bucket filterset up
Quick Funnel
You can also try and source these locally at your big box hardware/automotive stores.
This is used to filter into your bucket quickly, it has a large mouth - usually used for motor oil changes in cars.
Paint Strainer Cones 250 Pk.
These are for filtering any solids that are in your resin (after a failed print that might put a hole in your fep if you don’t catch it) IPA or paint.
Portable Power Battery Pump, Water&Fuel Transfer Pump
Keep your hands clean and avoid spills.
This is used to transfer your filtered IPA back into bottles for later use.
Based on Nerdtronic's video about it costing 4 cents or whatever, in my opinion - It's not completely accurate to say it only costs x/per for recycling - because your time isn't free, which is what I consider your most important resource. If you live where IPA is expensive - this method might be worth it because of expensive import taxes. So it’s up to you to decide whether you want to try this. If you’re someone that only prints sometimes - I’d personally just eat the cost of the IPA and consider it part of the game.
But the choice is yours, I’ve shown you how I did it, and you can too!
Special shout out to the community for so many people messaging me with their appreciation for the write-ups and how they helped with their own builds! I’ll be creating posts featuring what everyone else is doing - If you want to share yours - feel free to reach out @ u/nycraylin on Reddit.
Stay tuned for future updates. In the meantime, check out more blog posts below.
Until next time, Stay creating.
Ray @AsianJoyCo

Resin Safety 101
Stay Safe. Resin Printing can be as messy as it is fun. And its really fun.

Ventilation Upgrades for 3D Resin Printing
For a detailed post complete with a build list, check out my dedicated post here.
Digital Sculpting 101: Programs
New to digital sculpting? Learn about a few different programs you can use!
What kind of tablet is right for you? An intro to the tools for digital sculpting and modeling…